Published On:
17 Dollar Tree Stacking Pumpkins Ideas You’ll Want to Try This Fall
Share:


Dollar Tree stacking pumpkins are much more fun when you stop thinking of them as finished decorations. Their simple shape gives you a blank base for paint, fabric, flowers, Halloween characters, rustic finishes, and other inexpensive craft supplies.
The best part is that every project can have a completely different personality. You can create something cute for a kitchen, spooky for Halloween, rustic for a cottage, or eye-catching enough to display outside your front door. These 17 Dollar Tree stacking pumpkins ideas focus on real DIY transformations, rather than simply changing the color of the same pumpkin tower.
1. Turn Stacking Pumpkins Into a Fall Scarecrow
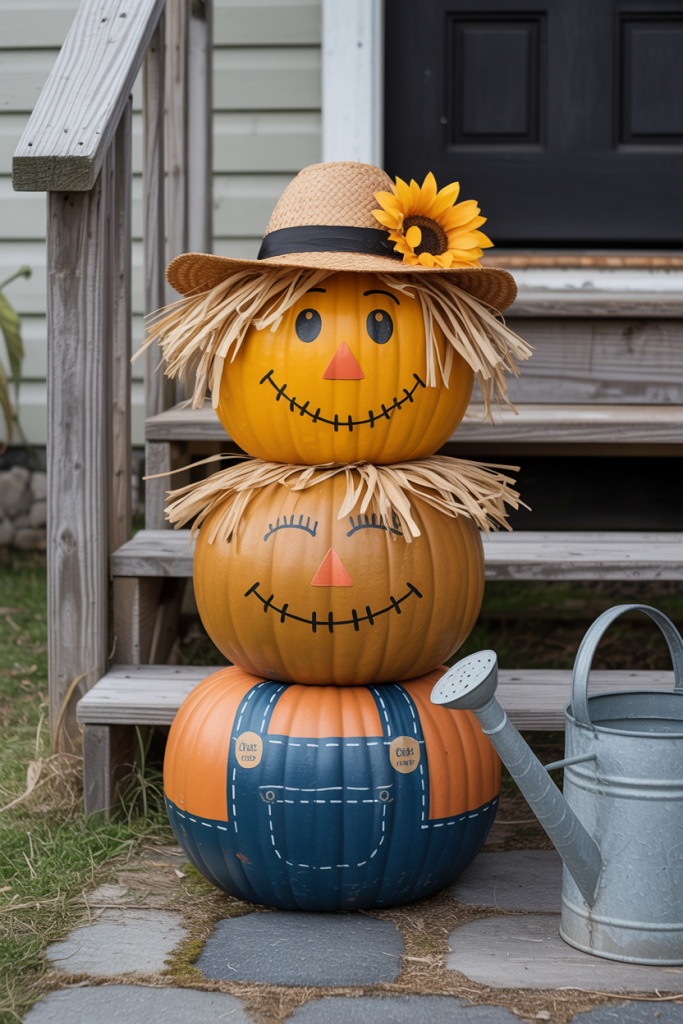
Turn your pumpkin stack into a friendly scarecrow instead of another traditional pumpkin topiary. Paint the bottom pumpkin denim blue to resemble overalls, use warm mustard or orange for the middle section, and turn the top pumpkin into the scarecrow’s face. A simple painted smile, triangular nose, and small black eyes are enough to give it character.
Finish the top with a thrifted straw hat, raffia “hair,” and a sunflower or two. Let pieces of raffia stick out between the pumpkins to make the design feel handmade. This is a fun choice for cottage steps, a covered porch, or beside a garden shed because it feels more like a fall character than ordinary seasonal decor.
2. Make a Spooky Purple Halloween Pumpkin Tower
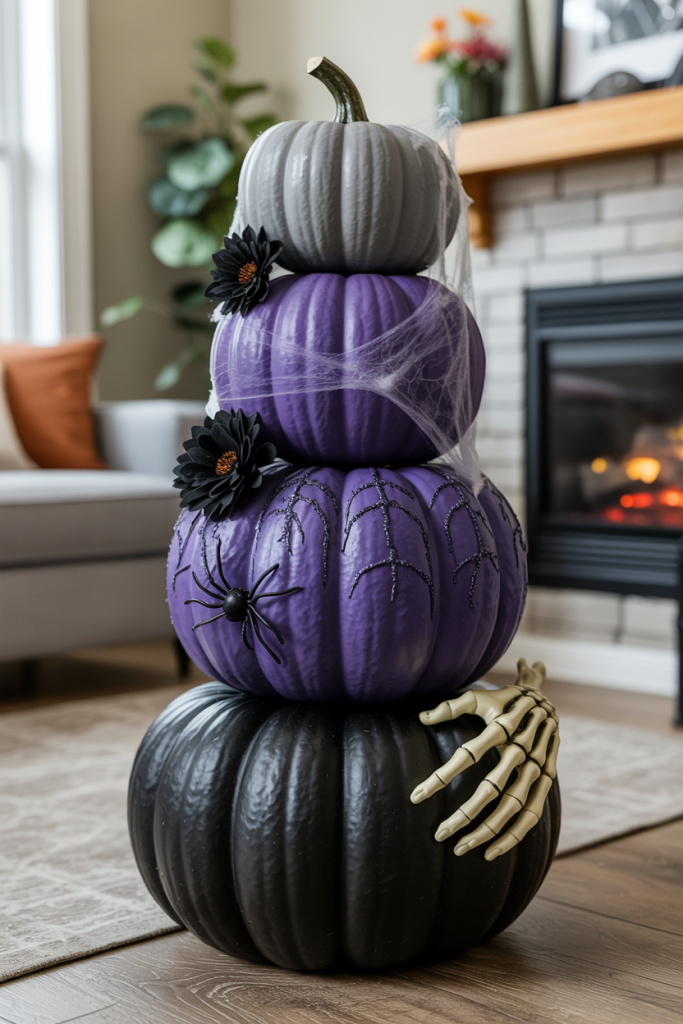
Give the stack a completely different personality with deep purple, black, and smoky gray paint. Instead of fall leaves and bows, decorate the spaces between the pumpkins with black faux flowers, plastic spiders, wispy webbing, and small skeleton details.
Try making the bottom pumpkin nearly black, the middle one rich purple, and the top one pale gray. A little dry-brushed black paint in the grooves will make the shapes more dramatic. This design would look great beside a fireplace, on a covered porch, or near a Halloween candy station. It keeps the recognizable stacked-pumpkin shape while turning it into something much moodier and more playful.
3. Create a Gingerbread Baker Pumpkin Stack
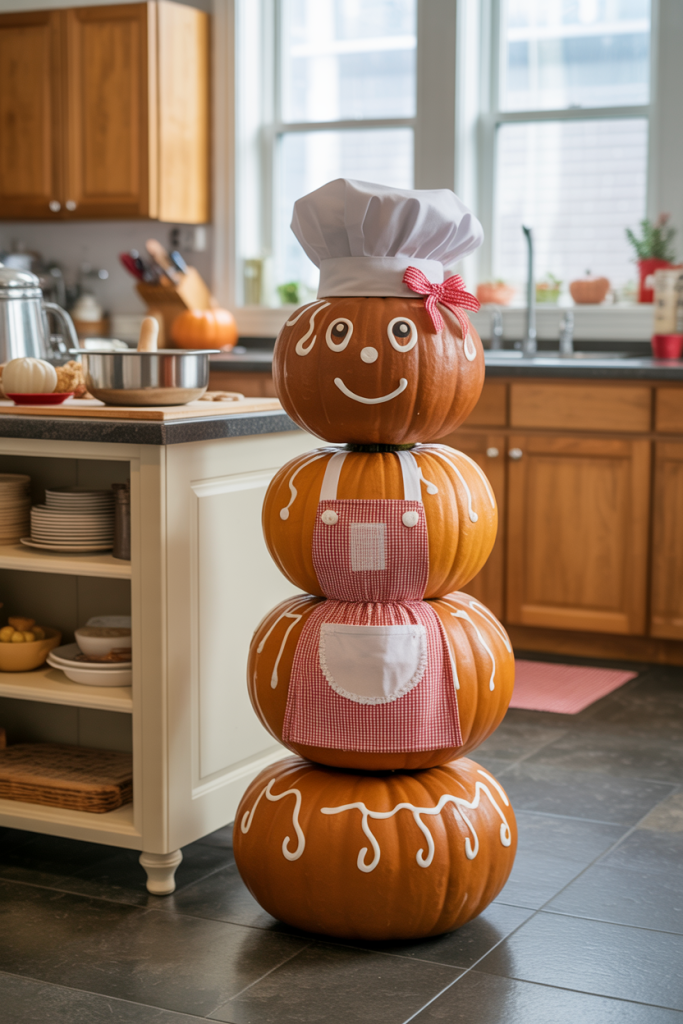
This is a cute way to use stacking pumpkins somewhere unexpected—the kitchen. Paint the pumpkins warm gingerbread brown, then turn the top section into a smiling baker with simple painted facial features. Add a small fabric chef hat and a red-and-white gingham bow.
The middle pumpkin can get a tiny handmade apron using inexpensive checked fabric, while painted white details can imitate piped icing around the edges. Set the finished piece on a kitchen counter, breakfast nook, or baker’s rack. It is whimsical enough to catch attention on Pinterest, but most of the details can be created with basic fabric scraps, ribbon, craft paint, and hot glue.
4. Make an Orange, Black, and White Patterned Stack
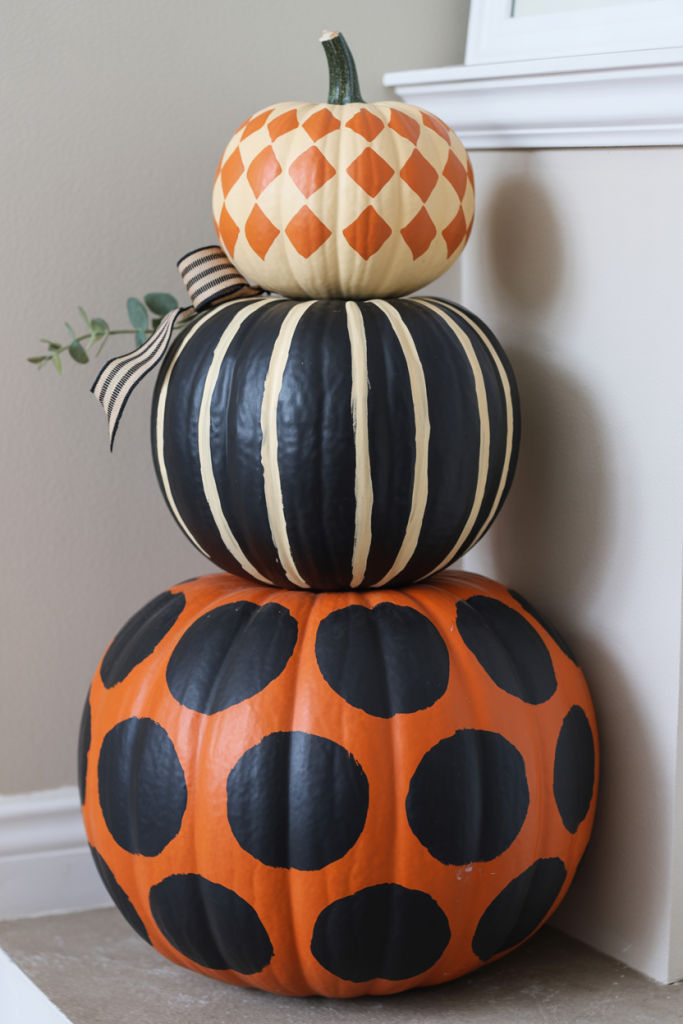
Instead of painting every pumpkin a solid color, treat each section as its own little canvas. Paint one bright burnt orange, another matte black with small orange dots, and the third cream with thin black vertical stripes. You can also add a simple diamond or harlequin pattern to one pumpkin.
Keeping the patterns different makes the entire tower feel much more handmade and interesting. Finish it with a black-and-white ribbon rather than traditional fall greenery. This is especially effective near a fireplace or in a small living-room corner where there is not enough space for a large seasonal display. The pumpkin tower provides plenty of pattern without needing extra decorations around it.
5. Build a Rustic Sunflower Pumpkin Topiary
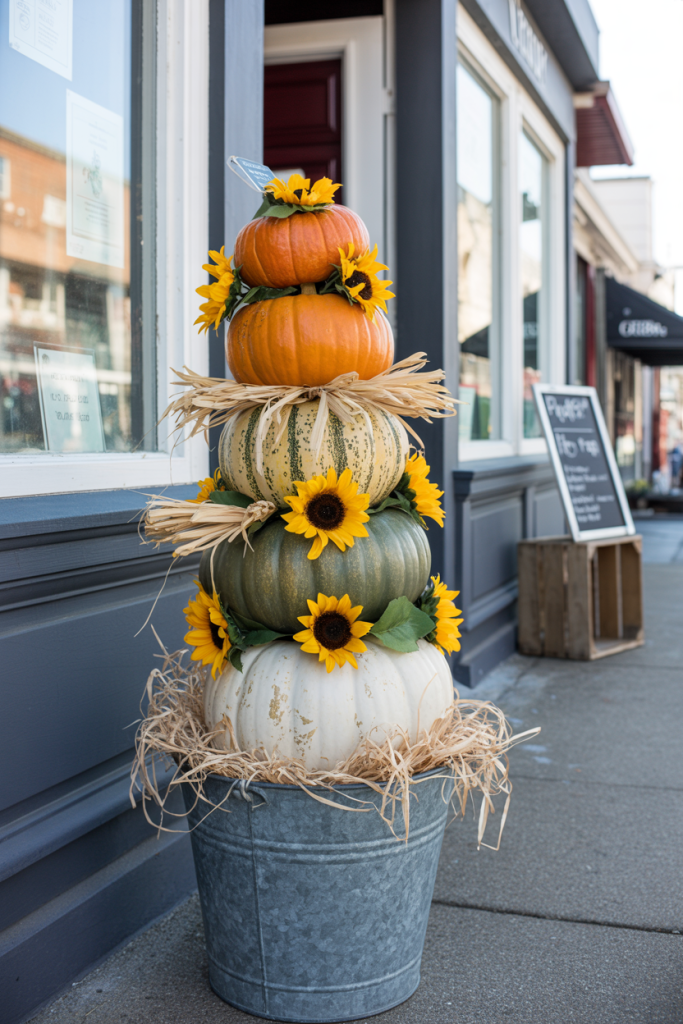
Use warm autumn colors and sunflowers to create a cheerful rustic version. Paint the pumpkins different earthy shades such as pumpkin orange, olive green, and warm cream. Instead of decorating only the top, tuck small sunflower heads between the individual pumpkin layers.
Add a little raffia, dried-looking foliage, or burlap around the gaps so the flowers appear integrated into the tower. You can place the finished stack in an old galvanized bucket, wooden crate, or inexpensive planter to give it extra height. It would fit naturally beside a farmhouse kitchen cabinet, on a rustic porch, or outside a small country-style shop without needing an elaborate surrounding display.
6. Create a Fabric-Covered Patchwork Pumpkin Stack
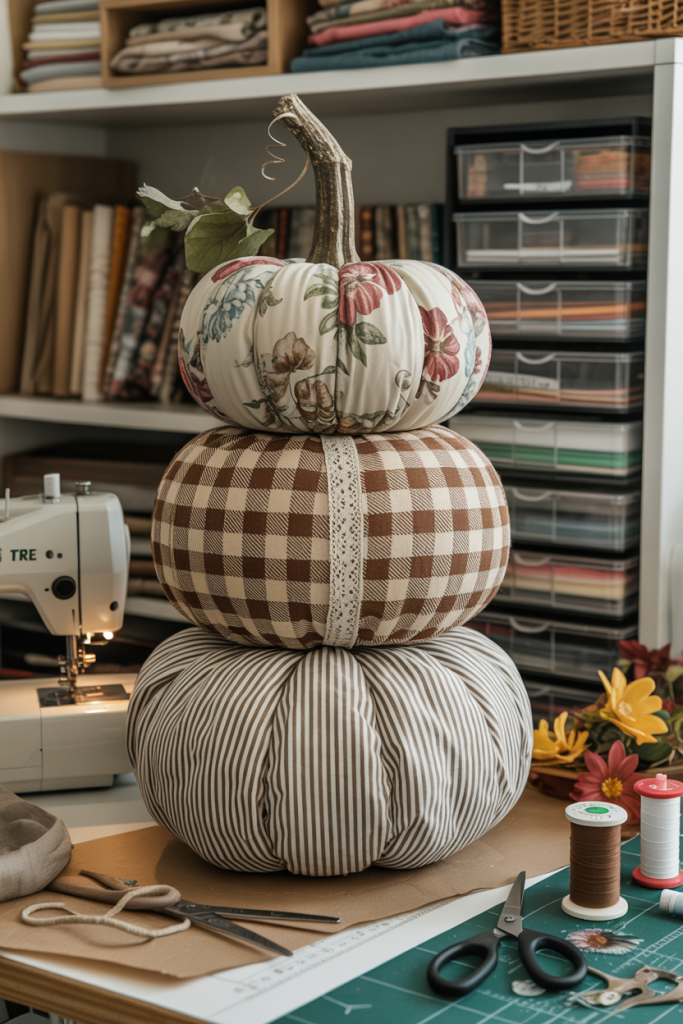
Fabric gives the plastic pumpkins an entirely new surface and opens up far more possibilities than paint alone. Cover each pumpkin with a different inexpensive fabric, such as small floral cotton, ticking stripe, plaid, or a tiny vintage-inspired print.
Smooth the material into the pumpkin grooves so the original shape remains visible, then hide unfinished edges where the pumpkins connect. You could add a small lace or velvet ribbon between two sections, but avoid covering every surface with embellishments. This project would feel especially at home in a sewing room, cottage bedroom, or craft corner, where the mixed fabrics become part of the room rather than looking like ordinary store-bought fall decor.
7. Turn the Pumpkins Into a Halloween Skeleton Stack
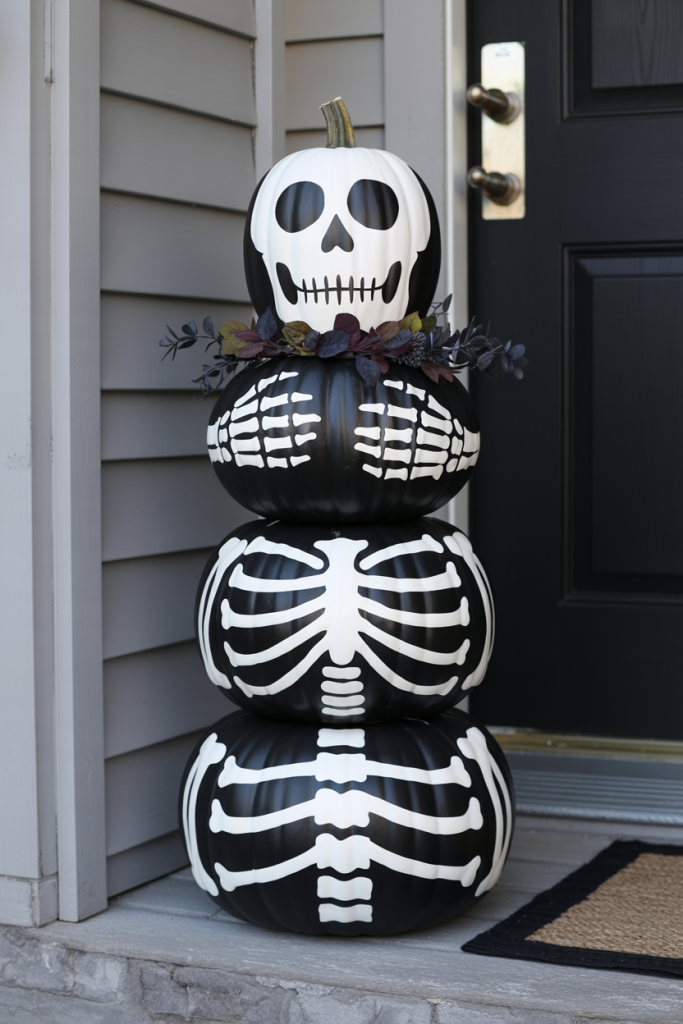
For a stronger Halloween project, paint the entire stack in black, white, and charcoal and give every pumpkin a different skeletal detail. The bottom could feature painted rib bones, the middle could have skeletal hands wrapping around its sides, and the top could become a simple skull-inspired face.
Add black faux flowers or dark purple foliage between the layers rather than orange autumn leaves. A distressed finish will keep the design from looking too shiny or plastic. Place it beside a dark front door, on a porch step, or near an indoor Halloween party table. It is still clearly made from stacking pumpkins, but the transformation is much more dramatic than simply painting them black.
8. Make a Distressed Cottage Pumpkin Stack
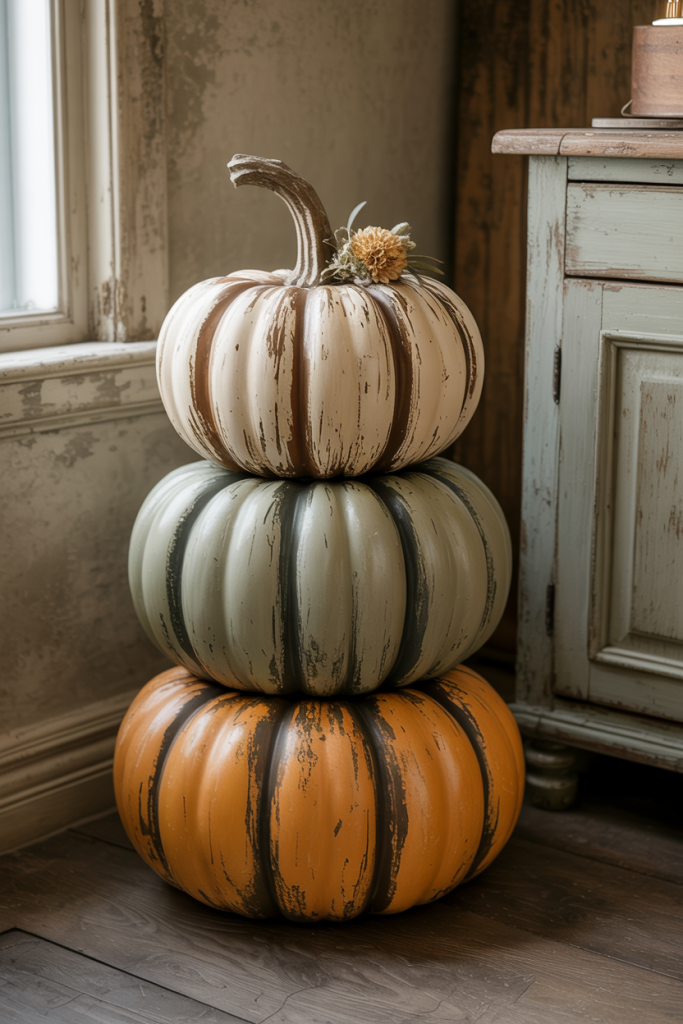
For a softer everyday fall look, give the pumpkins the appearance of old painted wood. Use faded cream, muted sage, and dusty pumpkin-orange paint, then lightly sand or dry-brush the raised ribs so darker layers show through.
Instead of a large bow, use a simple twisted twig stem and perhaps one small cluster of dried-looking flowers. The imperfect finish is what gives this project its charm, so do not try to make every painted section perfectly smooth. Place it beside an old cupboard, under a cottage console, or near a worn wooden bench. The finished stack should look like something collected over time rather than a shiny new seasonal decoration.
9. Create a Pumpkin Stack With Faux Tin Details
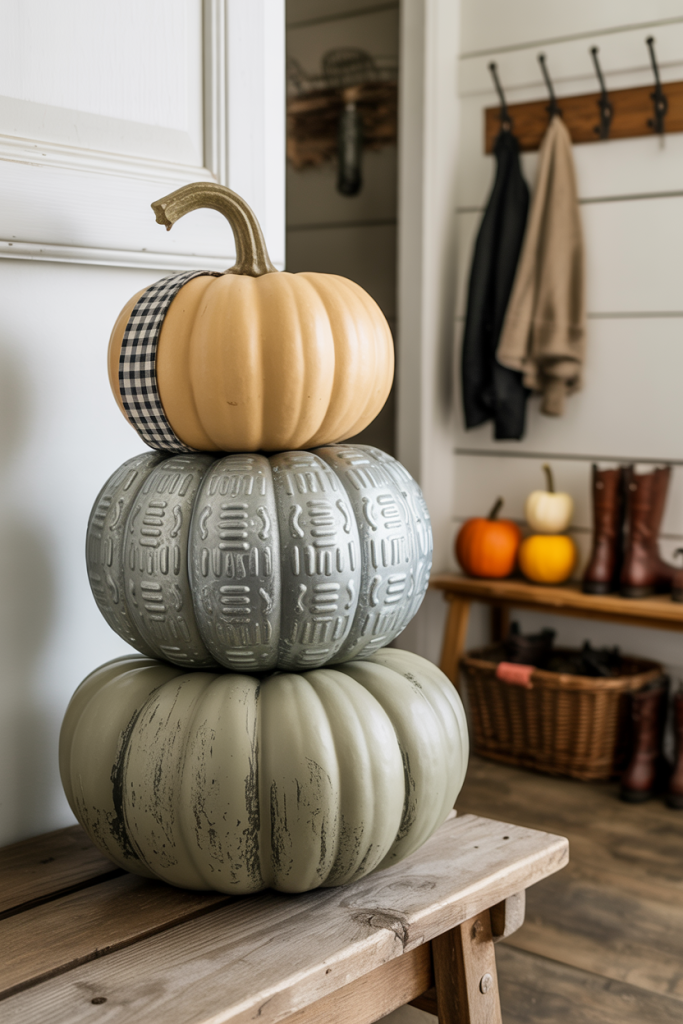
Give a farmhouse pumpkin tower more texture by adding faux galvanized or embossed-metal details. Paint the main pumpkins cream or muted green, then cover one section with a thin faux-tin panel, metallic craft sheet, or embossed material cut to follow the pumpkin’s shape.
A dark glaze lightly rubbed over the raised metal pattern can make it look older. Combine the metallic section with a simple striped or checked ribbon so the tower still feels warm rather than industrial. This works well in a farmhouse mudroom, near a utility-room shelf, or beside an old wooden cabinet. Mixing materials makes the DIY much more interesting than painting three identical plastic pumpkins.
10. Make a Flower-Covered Pumpkin Garden
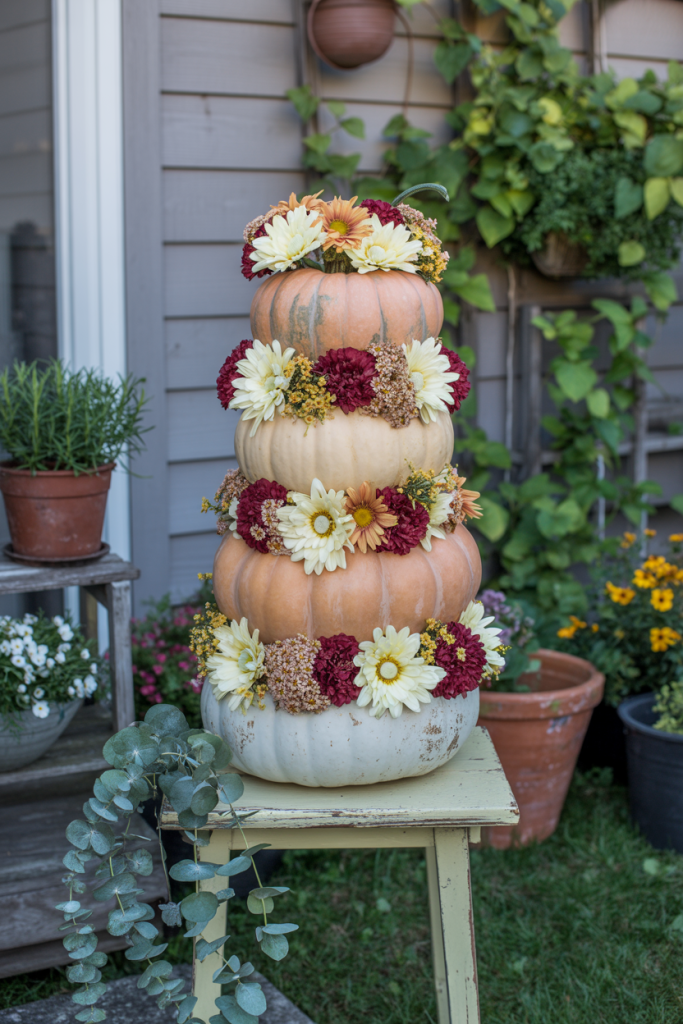
Instead of placing a few flowers around the top, make flowers the defining feature. Paint the pumpkins a simple neutral color such as ivory or faded peach, then create thick bands of small faux flowers between the stacked sections.
Use different flowers for each band—perhaps cream mums, dusty burgundy blooms, and muted orange daisies—while allowing a little greenery to trail naturally down one side. The pumpkins should still remain visible so the project does not become one large flower arrangement. Display it on a small cottage table, beside a garden-room window, or on a sheltered patio where the floral design connects naturally with the surroundings.
11. Paint a Harlequin Pumpkin Stack
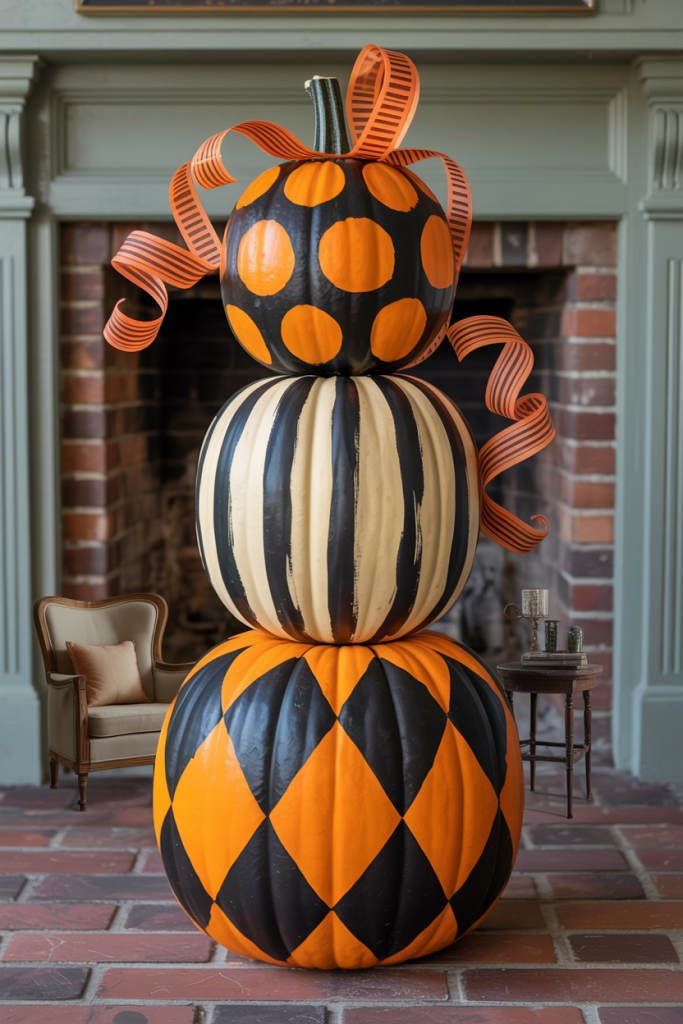
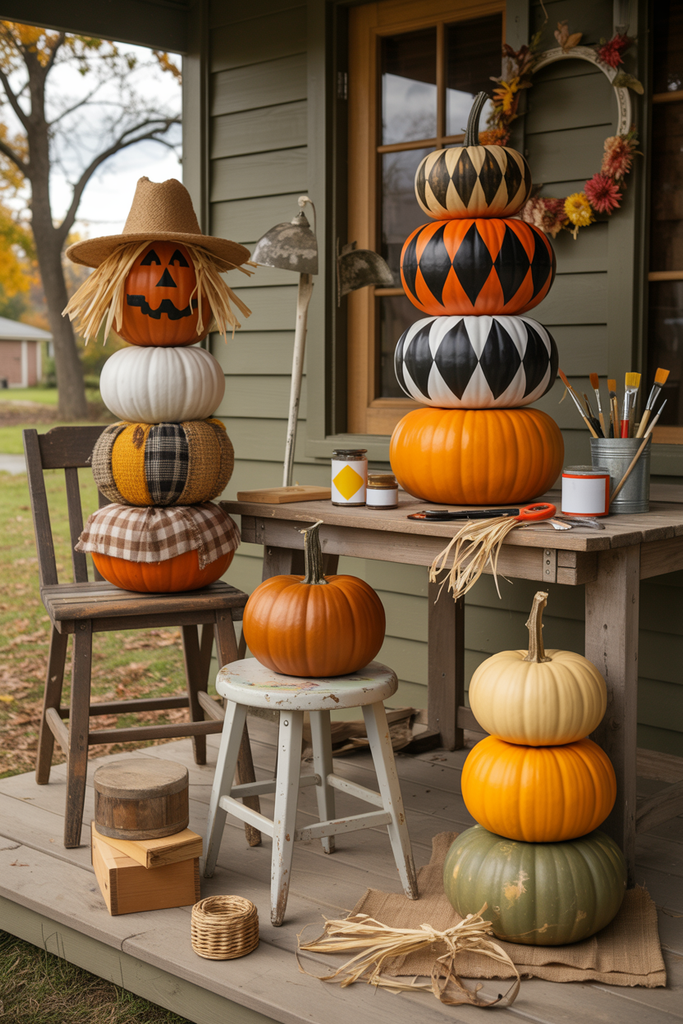
A harlequin design creates the bold graphic look seen in many creative stacked-pumpkin makeovers. Paint the largest pumpkin with black-and-orange diamonds, give the middle pumpkin black-and-cream stripes, and use oversized dots or checks on the top.
The lines do not need to look machine-perfect. Slightly uneven hand-painted shapes actually make the finished project feel more like a real DIY. Add one dramatic striped bow or curled ribbon at the top rather than filling the tower with leaves. This is an ideal statement piece beside a fireplace, on a small apartment entry table, or on a covered porch where a single decoration needs to provide most of the seasonal color.
12. Make a Pumpkin Stack With Plaid Fabric Panels
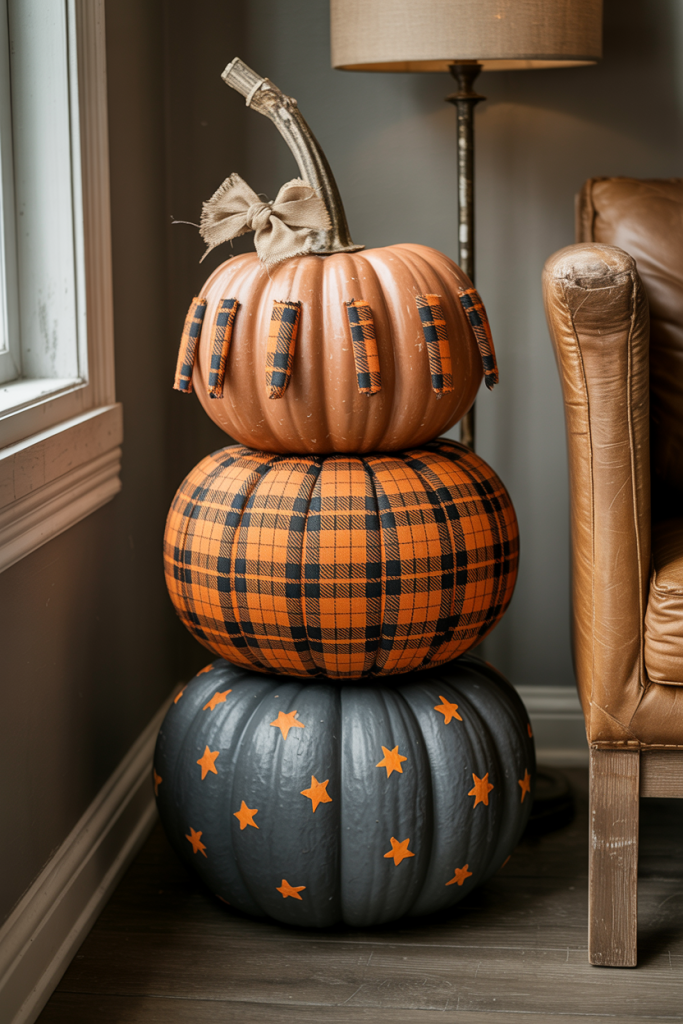
Rather than wrapping the entire pumpkin in fabric, combine painted surfaces with fabric panels. Paint the largest and top pumpkins charcoal or distressed orange, then cover the middle pumpkin with orange-and-black plaid fabric.
You can also cut smaller plaid sections to fit individual ribs of another pumpkin, leaving painted ribs between them. Add frayed burlap around one seam to hide unfinished fabric edges and reinforce the handmade appearance. The mixture of smooth paint, soft fabric, and rough burlap gives the tower plenty of texture. Try this project beside a rustic chair, in a small reading corner, or on cottage steps where the plaid pattern will be easy to notice.
13. Create a Primitive Country Pumpkin Stack
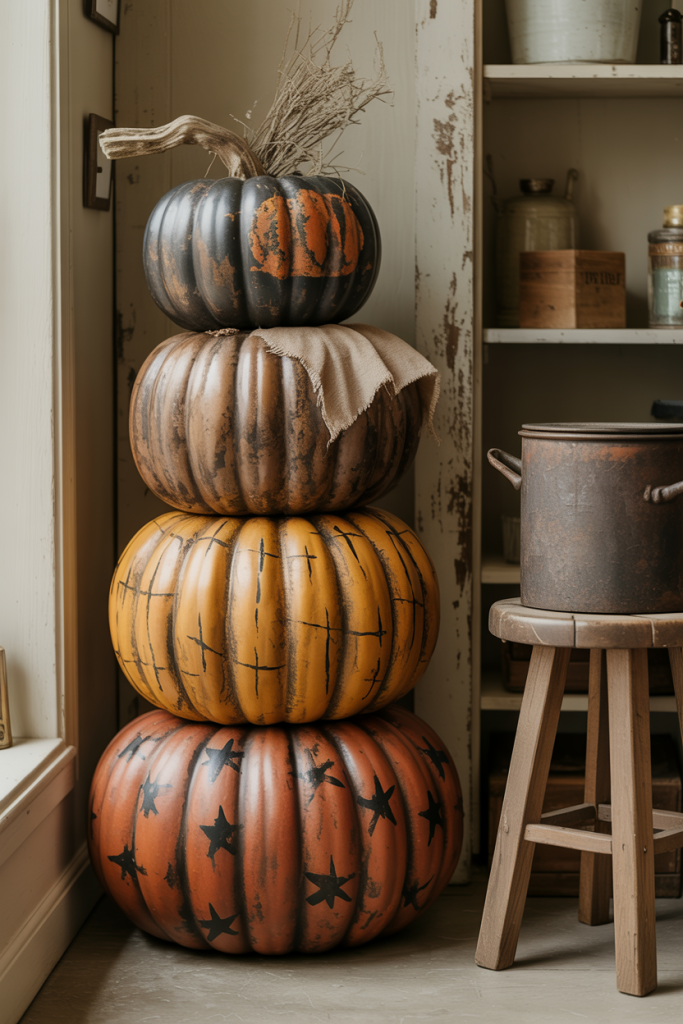
Primitive decor works especially well with inexpensive pumpkins because it does not need a perfect finish. Paint the pumpkins deep mustard, brick red, faded black, and muted pumpkin orange, then distress the surfaces heavily with dark brown paint.
Add simple black stars, stitched-looking lines, or small hand-painted motifs rather than polished patterns. Wrap a little cheesecloth or torn homespun fabric around one section and replace the plastic stem with a rough twig. Place the stack near an old crock, wooden bench, or vintage cabinet in a rustic interior. The goal is to make the project look handmade and slightly aged, almost like an old country craft discovered at a flea market.
14. Turn the Stack Into a Pumpkin Witch
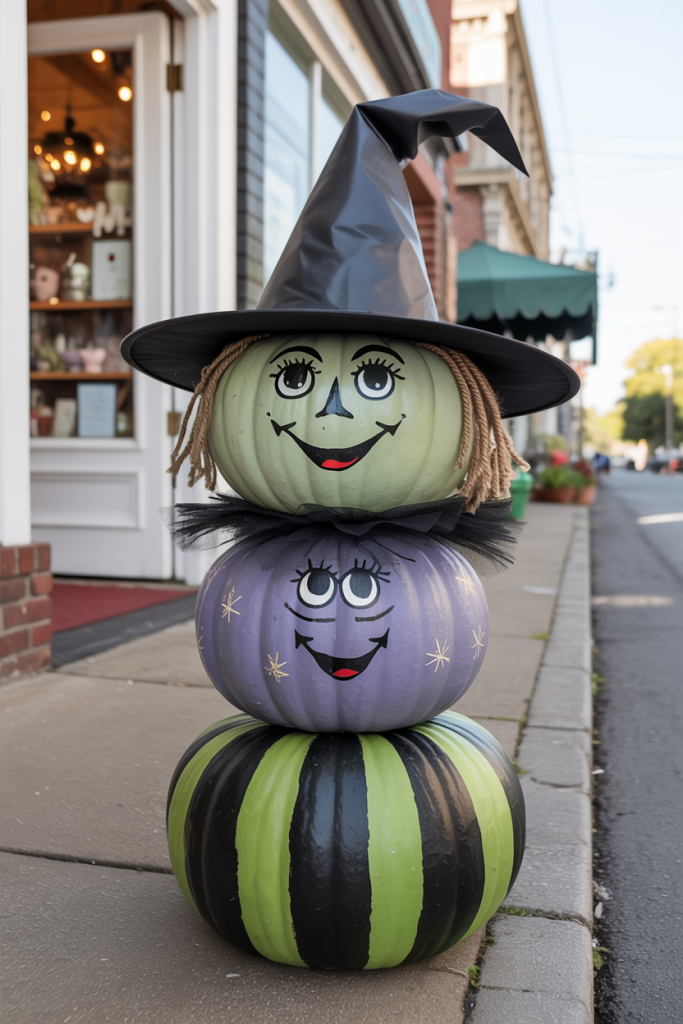
Transform the pumpkins into a Halloween character by making the top pumpkin a friendly witch. Paint a simple face with expressive eyes, a small crooked nose, and a playful smile, then add a pointed black hat.
The lower pumpkins can become the witch’s outfit using purple, black, and green paint. Try stripes on one section and small stars or dots on another. A scrap of black tulle or ribbon between the layers can imitate part of her costume without hiding the pumpkin shapes. Place her outside a small shop entrance, beside a Halloween porch bench, or in a family room where the character can become the main seasonal decoration.
15. Make a Whitewashed Farmhouse Pumpkin Tower
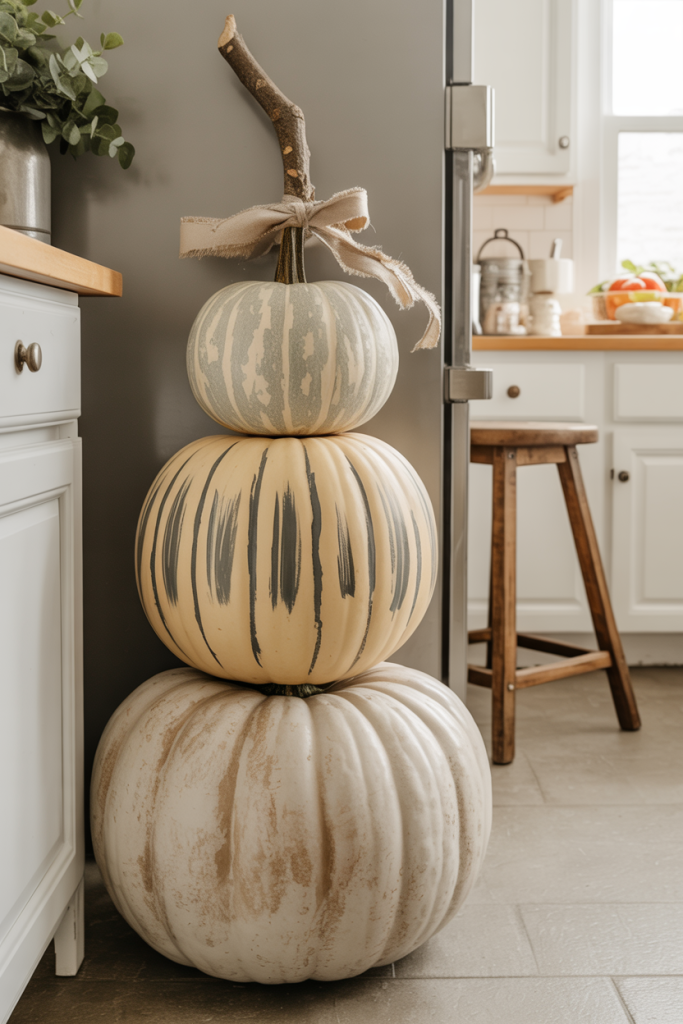
A farmhouse version can still feel handmade if you focus on texture rather than adding lots of accessories. Paint the pumpkins warm white and cream, then use brown or gray dry-brushing to emphasize the ribs and create a worn whitewashed finish.
Change the stem to a thick natural branch and tie a narrow strip of frayed linen around it. You could also paint one pumpkin with very thin charcoal stripes to break up the all-white tower. Place it beside a farmhouse pantry door, kitchen hutch, or simple wooden staircase. Because the palette is quiet, the distressed surfaces and different pumpkin details need to provide the visual interest.
16. Build a Light-Up Jack-O’-Lantern Stack
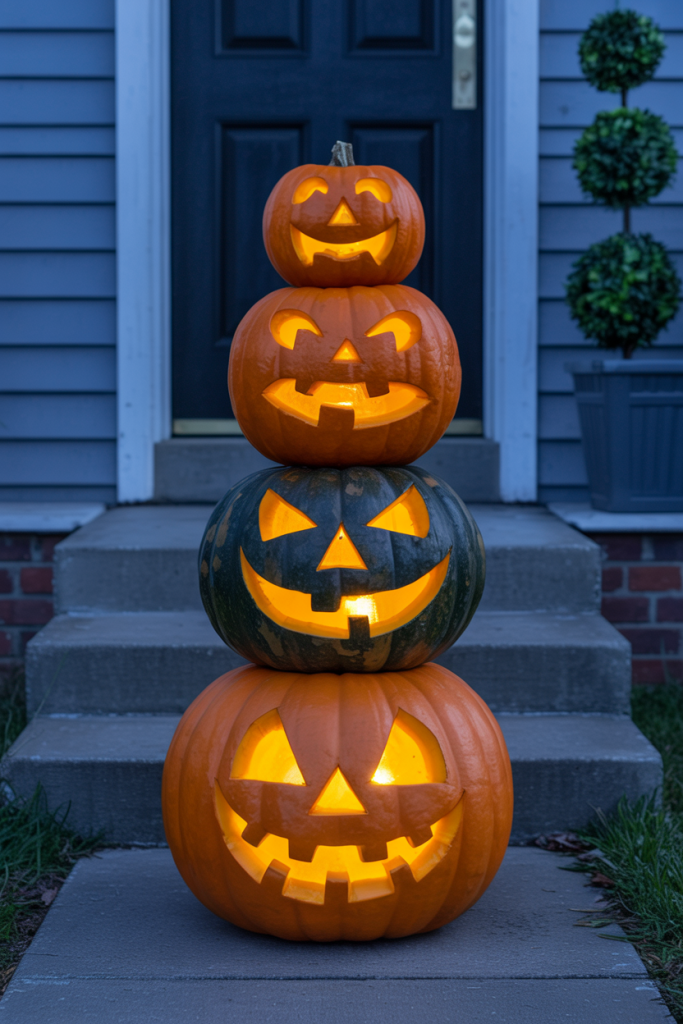
Turn the project into something that looks completely different after dark. Cut or carefully create jack-o’-lantern-style faces on the pumpkin sections and place battery-powered lights inside so each face glows.
Give every pumpkin a different expression instead of repeating the same triangle eyes and smile. Paint the outside traditional orange, black, or even a mixture of the two, and keep the surrounding embellishments minimal so the glowing faces remain the main feature. This project is ideal for front steps, a patio, or beside an outdoor Halloween candy table. During the day it works as a colorful pumpkin tower, while at night it becomes an illuminated Halloween decoration.
17. Make a Reversible Pumpkin and Snowman Stack
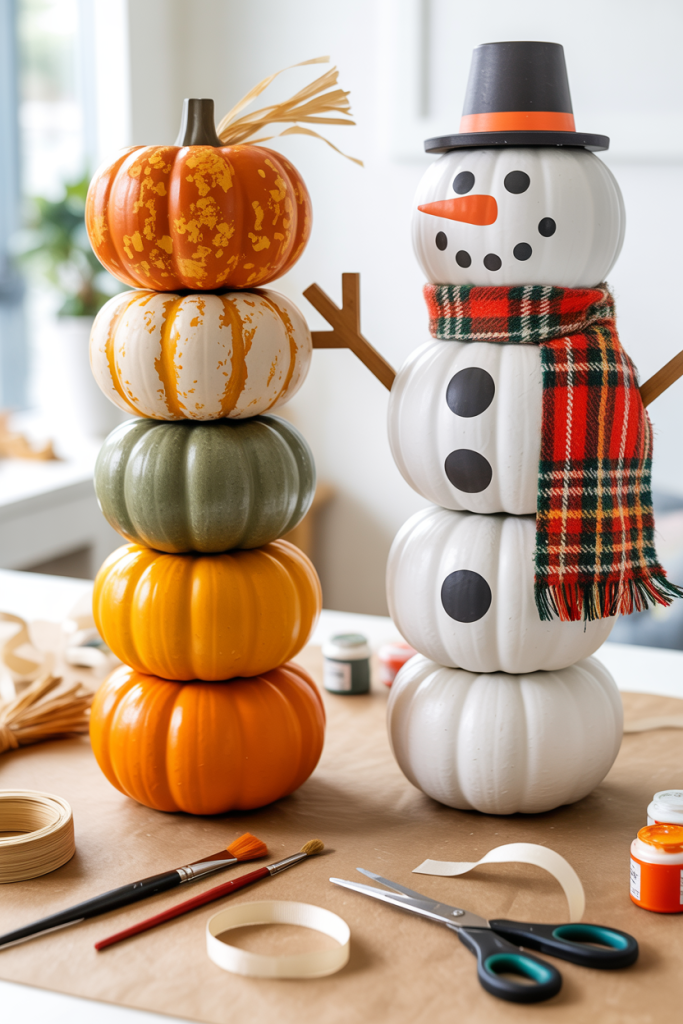
A reversible design lets one Dollar Tree project stay out beyond fall. Decorate one side as an autumn pumpkin tower using orange, cream, and muted green, then turn the reverse into a snowman for winter.
For the snowman side, paint the pumpkins white and add simple coal-style buttons, a friendly face, scarf, and small winter hat. Keep removable fall decorations attached with ties or another temporary method so they can be taken off when you turn the piece around. This idea is especially practical for a small home or apartment because you do not need to store two large seasonal decorations. One DIY can move from an autumn entryway straight into Christmas and winter decor.
Conclusion
Dollar Tree stacking pumpkins do not have to become the same orange, cream, and green topiary every time. The basic pumpkin shape can become a scarecrow, witch, skeleton, gingerbread baker, glowing jack-o’-lantern tower, floral display, patchwork fabric craft, primitive country decoration, or reversible winter piece.
The biggest difference comes from changing the actual DIY technique—not simply changing where you display it. Fabric, dimensional details, characters, patterns, flowers, lighting, distressed finishes, and mixed materials can each give inexpensive stacking pumpkins a completely new look. That also makes it easier to choose a project that fits your own home, whether you are decorating a tiny apartment corner, everyday kitchen, rustic cottage, farmhouse mudroom, front porch, garden, or small shop entrance.
Frequently Asked Questions
How do Dollar Tree stacking pumpkins fit together?
Dollar Tree’s published craft tutorial describes a three-piece plastic set with screw-together connections. Your set may differ, so inspect the pieces and follow any included directions before decorating. Test the assembly first, and leave threads, tabs, or other connection points free from paint buildup, fabric, and adhesive so the pieces still fit correctly. dollartree.com
What paint should I use on plastic stacking pumpkins?
Choose a paint system labeled for the type of plastic or surface you are decorating, and check whether it requires a separate primer. Clean and dry the pumpkins first, then test a hidden area. Follow the label’s ventilation, recoating, and curing directions rather than assuming ordinary craft paint will stick well to every plastic.
Can decorated stacking pumpkins stay outside?
That depends on the pumpkins, coatings, adhesive, and added decorations. A plastic base does not make fabric, paper, ribbon, or battery lights weatherproof. Check the labels for every material and favor a covered spot when suitability is uncertain. Bring the display inside during rough weather, and do not assume a decoupage finish makes it waterproof. Plaid Online
How can I stop a pumpkin stack from tipping over?
Begin with the intended connectors and a broad, level base. For a planter display, keep weight low in the container and secure the stack to a firm support suited to its construction. Weight in the pot alone will not stop an unsecured stack from falling out. Test the finished display gently before placing it near a walkway.
What can I use if Dollar Tree stacking pumpkins are unavailable?
Use graduated craft pumpkins from another discount or craft store, choosing pieces with stable contact points. Small foam pumpkins can suit tabletop projects, while flat pumpkin cutouts work for framed displays. Check how the pieces can be joined before buying them; three decorative pumpkins will not necessarily stack securely without a base or additional support.